

Tutorial: Pre-create inquiries for Embedded Flow
An Embedded Flow embeds Persona’s verification UI directly into your website as an iframe.
There are two ways to use Embedded Flow:
- Generate inquiries from an inquiry template (Minimal code required)
- Pre-create inquiries via API (More code required)
This guide walks you through the second method: pre-creating inquiries via API. This is the method we recommend you use in production.
You will:
- Create inquiries with prefilled user data in your backend server
- Check for existing inquiries to avoid duplicates
- Enable the user to resume partially-completed inquiries
- Pass an inquiry ID to your frontend
- Display the Embedded Flow with an inquiry ID
The sample code in this guide illustrates an approach that we recommend in production.
However, for demonstration purposes, the code itself is simplified and not production-ready. For example, it does not include:
- Authentication
- Fetching real user information from a database
- Error handling and retry logic
- Monitoring
Pre-creating inquiries (the method shown in this guide) is recommended for production use. However, if you’re looking for the fastest way to test Embedded Flow, see Tutorial: Embedded Flow with Inquiry Template.
Prerequisites
You’ll need:
- A Persona account
- A Persona API key - use the Sandbox API key
- Python installed locally
- This guide provides sample code in Python, but you can adapt it to any language.
Before you start, you should:
- Understand what an inquiry is
- Understand inquiry statuses
- Complete Tutorial: Embedded Flow with Inquiry Template to understand the SDK
- Sign into the Persona dashboard and switch into your Sandbox environment
Scenario
A user named Alexander Sample just joined your dog walking app as a dog walker. You want to verify his identity to ensure the safety of users on your service.
Alexander’s user ID in your app is “usr_ABC123”. During account signup in your app, he stated his birthdate is August 31, 1977.
Step 1: Create an inquiry template
Every inquiry is created from an inquiry template, which defines details like the specific verification logic and UI text and branding of that inquiry. You can think of inquiry templates as a mold that lets you create many inquiries.
Persona offers a suite of solutions that include preconfigured inquiry templates. In this tutorial, use the “KYC” solution to verify your dog walkers.
Follow these instructions to add the “KYC” solution to your Sandbox environment.
Step 2: Locate the inquiry template ID
Find the ID of the newly-created inquiry template.
In the Persona dashboard, navigate to Inquiries > Templates. Find the “KYC” template in the list of inquiry templates, and note the value in the ID field. The value should begin with itmpl_.
Step 3: Create the web page
Create the web page that will display the Embedded Flow. This page shows the user onboarding flow that Alexander Sample is completing in your dog walking app.
-
Create a new directory called
embedded-flow-precreate-demo/. Then create a subdirectory calledfrontend/. -
Inside
frontend/, create a file calledonboarding.htmlwith the following code:
- In the code, replace:
X.Y.Zwith the latest SDK versionenv_XXXXXXXXXXXXXwith your Sandbox environment ID. Here’s how to find it.
- Serve the frontend HTML file from a local python server:
Keep this terminal window open.
- Open
http://localhost:8001/onboarding.htmlin your browser to view the page.
You should see the onboarding flow for our newly-registered dog walker:
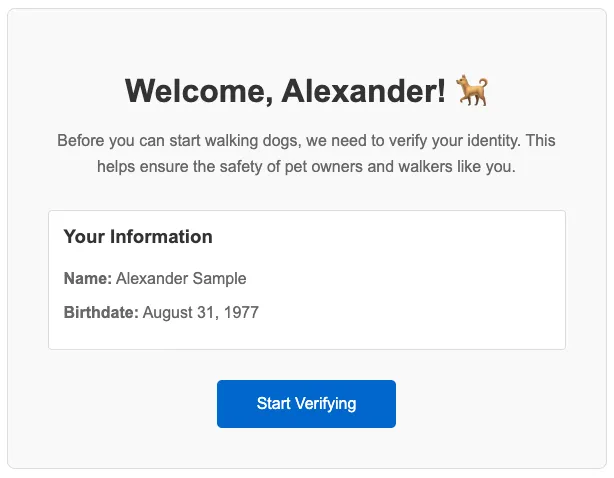
Right now, the “Start Verifying” button doesn’t work. Notably, we haven’t yet built the backend API that it hits.
About the frontend code
The UI and styling here are identical to the code in the Embedded Flow with Inquiry Template tutorial.
The key difference is in the JavaScript:
- We fetch the inquiry ID from our backend:
Our backend determines if an inquiry exists or needs to be created. If an inquiry exists and it needs to be resumed, the backend also returns a session token that lets the client resume that inquiry.
- We initialize the Persona client with
inquiryIdinstead oftemplateId:
This approach is more secure because users can’t change the reference ID or prefilled fields.
Step 4: Create the backend API
Now, create a backend server with one endpoint that returns an inquiry for the current logged-in user. If the user has an in-progress inquiry, the backend will return that inquiry’s ID. Otherwise, the backend will create a new inquiry and return its ID.
-
Create the
embedded-flow-precreate-demo/backend/subdirectory. -
Create the file
backend/server.pywith the following code:
In this code, replace:
itmpl_XXXXXXXXXXXXXwith your inquiry template ID from Step 2
- Create the
backend/requirements.txtfile:
- Install required dependencies:
- Set your Persona Sandbox API key as an environment variable:
- Start the server:
You should see:
Keep this terminal window open.
About the backend code
This backend implements three key features:
- Find existing incomplete inquiries: The backend searches for inquiries that the current user has created but not finished. (Note that you must consistently provide a reference ID for each inquiry you create, if you want to be able to use the reference ID to look up all inquiries created for a given user.)
- Resume incomplete inquiries: If the user has a “pending” inquiry (an inquiry that they have submitted information to but not completed), we enable them to resume the inquiry by creating a new session token.
In a production app, you may want to handle additional inquiry statuses beyond “created” and “pending”. For example, if a user has any finished inquiry (“completed” or “approved”), you may not want that user to create a new inquiry.
See this guide for a list of other statuses you might want to handle.
3. Securely prefill data in new inquiries: All new inquiries are created on the backend, so user data is set where users can’t modify it.
Step 5: Set up a webhook (optional)
You can receive notifications when any inquiry’s state changes. For example, you can be alerted when any inquiry is started by a user, or when any inquiry is completed. See the full list of inquiry events you can be alerted about.
To receive automatic notifications:
- Create a webhook endpoint (for a sample server, see Webhook quickstart)
- In the dashboard, navigate to Webhooks > Webhooks.
- Add your endpoint URL
- Select the following “Enabled events”:
inquiry.started,inquiry.completed,inquiry.approved,inquiry.declined, andinquiry.failed
For this tutorial, you can skip webhooks and view results in the dashboard.
Step 6: Test the complete flow
Test the inquiry creation and resumption logic with different scenarios. When doing these manual tests:
- Do not enter real personal information, since this is Sandbox.
- Keep the “Pass verifications” toggle enabled (visible at the bottom of the flow) to simulate passing all the checks.
Scenario 1: Create new inquiry
- Click “Start Verifying”
- Wait for the Persona modal to open
- Check backend logs for:
No incomplete inquiry found, creating new one - Close the modal without entering any information
Scenario 2: Resume created inquiry
- Refresh the page
- Click “Start Verifying”
- Check backend logs for:
Found existing inquiry inq_XXXXXXXXXXXXX with status: createdInquiry is created, continuing without session token
- Complete the government ID verification step
- Stop before completing the selfie verification
- Close the modal
Scenario 3: Resume pending inquiry
- Refresh the page
- Click “Start Verifying”
- Check backend logs for:
Found existing inquiry inq_XXXXXXXXXXXXX with status: pendingInquiry is pending, generating session token to resume
- Check that the Persona modal starts at the selfie verification step (government ID already completed)
- Complete the selfie verification
Scenario 4: Create new inquiry after completion
- Refresh the page
- Click “Start Verifying”
- Check backend logs for:
No incomplete inquiry found, creating new one - Check that the Persona modal shows a new inquiry
- Do not complete this inquiry
Step 7: (optional) Inspect webhook events
If you set up the webhook in Step 5, check your server logs. You should see events from inquiry.started, inquiry.completed, and inquiry.approved.
Note: If you want to receive the inquiry.failed event, you can reload the page and click “Start Verifying” again. Then click through the verification flow, this time with the “Pass verifications” toggle disabled.
Step 8: View inquiry results
In the Persona dashboard:
- Navigate to Inquiries > All Inquiries
- Find Alexander’s inquiries (search by reference ID
usr_ABC123)
You should see two inquiries if you tested all four scenarios above. Click on each to see their status and details. Note that because this inquiry was created in Sandbox, some of the data shown will be demo data.
You can also retrieve inquiry details via API. You’ll need the inquiry ID you see printed in the “Debug info” section of the UI. See Retrieve an Inquiry.
Step 9: Disable client-side inquiry creation
Now that you’re creating inquiries server side, you can block client-side inquiry creation completely. This ensures users can’t create inquiries using the template ID approach.
To disable client-side inquiry creation for your “KYC” inquiry template:
- In the Persona dashboard, navigate to Inquiries > Templates.
- Select the “KYC” template.
- Click the gear icon to open Settings.
- Navigate to Security.
- Enable Block client-side Inquiry creation.
Summary
In this tutorial, you built an Embedded Flow integration that:
- Pre-creates inquiries securely on the backend
- Prevents duplicate inquiries by checking for incomplete ones
- Enables inquiries to be resumed with session tokens
- Prefills user data securely on the server side
You also:
- Built a frontend that receives inquiry IDs from your backend
- Tested a whole inquiry lifecycle (create → resume → complete)
This is a complete example of how you can pre-create inquiries for Embedded Flow.
Next steps
Enhance this integration:
- Subscribe to additional events: Understand the different inquiry events you can be alerted about, and the difference between the “Done” and “Post-inquiry” phases.
- Learn webhook best practices: In production, you’ll need to handle duplicate events and other issues.
Explore further:
- Explore the KYC solution: The KYC solution includes two Workflows and a Case template. In this tutorial, the Workflows seamlessly ran in the background and changed the final status of your inquiry from
completedtoapproved. - Explore other integration methods: Try Hosted Flow if you would like to distribute verification links, or Mobile SDK for native apps. See Choosing an integration method.