This guide will help you get started with using Persona's API
The Persona API provides a flexible, secure, and scalable way to integrate identity verification, compliance, and fraud prevention into your application. Whether you’re a developer looking to quickly test the API or planning a full-scale production integration, this guide will help you get started efficiently.
This Getting Started section will guide you through:
- Understanding the Persona API and when to use it.
- Setting up your account and obtaining API credentials.
- Making your first API call to see it in action.
- Exploring common use cases and examples.
Before you begin
Before you can start making API calls, you’ll need a Persona account. Your account will allow you to create and manage identity verification inquiries, verifications, reports, and other API resources.
If you already have a Persona account, begin Step 2 below.
If you do not have a Persona account:
- Go to Persona Sign-up
- Register with your business email and create your organization.
Step 1: Log in to the Persona Dashboard
-
After verification, log in to the Persona Dashboard.

Sign in with your Business email and click "Sign in" to get to the Persona Dashboard
-
Complete the onboarding flow, which will guide you through:
-
Setting up your organization details
-
Learning about Persona’s verification process
Once logged in, you’ll have access to API Keys, Inquiry Templates, and Webhooks, which are essential for integrating the Persona API.
Step 2: Choose your environment
Persona has two types of environments:
- Sandbox - For testing and development (recommended for new users).
- Production - Live environment with real user data.
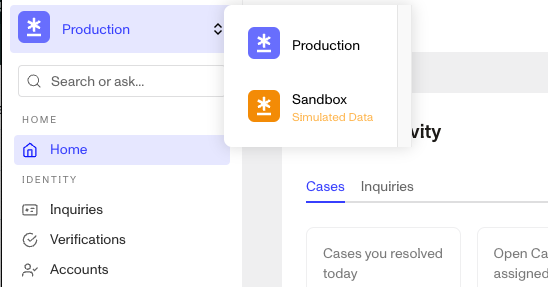
To learn more about the Persona Environments you can read more here.
Note about the Production environment:
Access to the Production environment requires approval. Ensure your organization is verified before proceeding. You must select a plan on the billing page to gain production access.
Step 3: Get your API Key
Keep your API Keys secure
Your API keys carry many privileges, so be sure to keep them secure! Do not share your secret API keys in publicly accessible areas such as GitHub, client-side code, and so forth.
To access the Persona API, you'll need an API key. Each environment has its own API key; select the API key for the specific environment you would like to use. Go to Persona Dashboard → API → API Keys
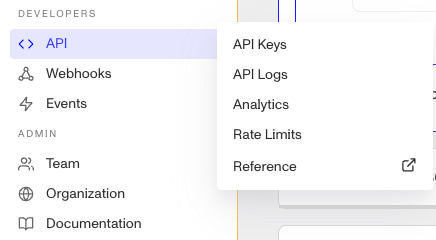
Persona Dashboard → API → API Keys
You will see all your API keys on the API key page. You can also click "Create API key" if you need a new one. Here you can click the "Copy" button to copy your API key.
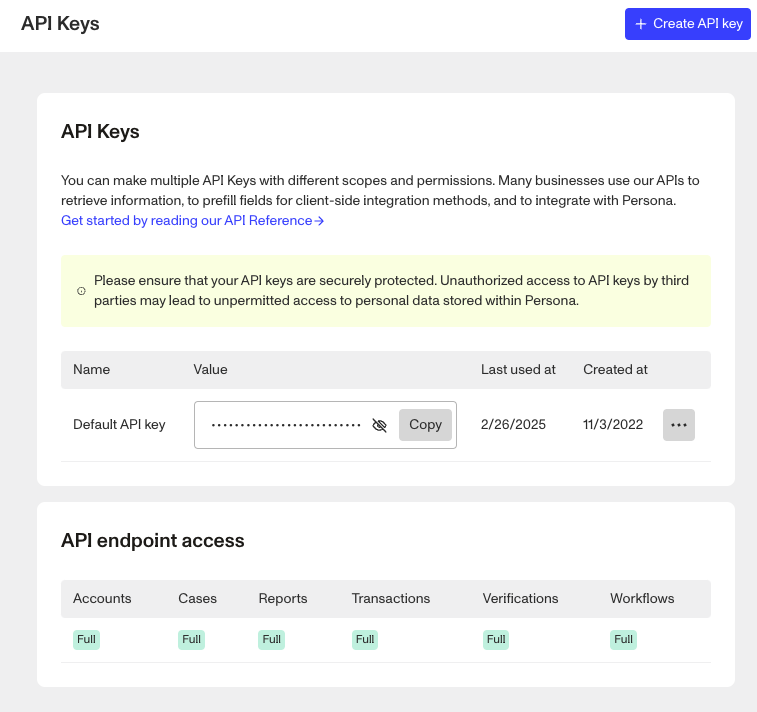
API Keys Dashboard Page
Do you need to set Permissions on the API key?
Before moving on it is important to know that API permissions are not limited until you limit them. To learn more about configuring your API key see API Key
Step 4: Make your first API request
At this stage, you're ready to make your first API request. You may choose to make a request relevant to your solution or integration with Persona. The API Reference provides a detailed selection of the various requests you may choose to make.
Since most businesses integrate with Persona using the Inquiries product, this Quickstart Tutorial will guide you through the Create an Inquiry endpoint as an initial example.
What is an Inquiry?
An Inquiry represents a single instance of an individual verifying their identity. As an individual completes verification, the inquiry moves through various statuses:
Created,Pending,Completed,Approved/Declined,Expired, orFailed.Learn more about how to Configure your Inquiry Template.
Create an Inquiry using the API reference provided
Persona’s API documentation provides an interactive request tool that allows you to create an Inquiry without manually writing code. As you configure the request through the UI, the tooling automatically generates code snippets in multiple programming languages, making it easy to integrate the API into your application.
A recommended best practice is to first make sample calls through the API Reference to better understand the shape of responses and debug obvious issues. From there, you can proceed to copying the automatically generated calls into your desired language for building programatic requests from your product or service to Persona.
1. Open the Create Inquiry page
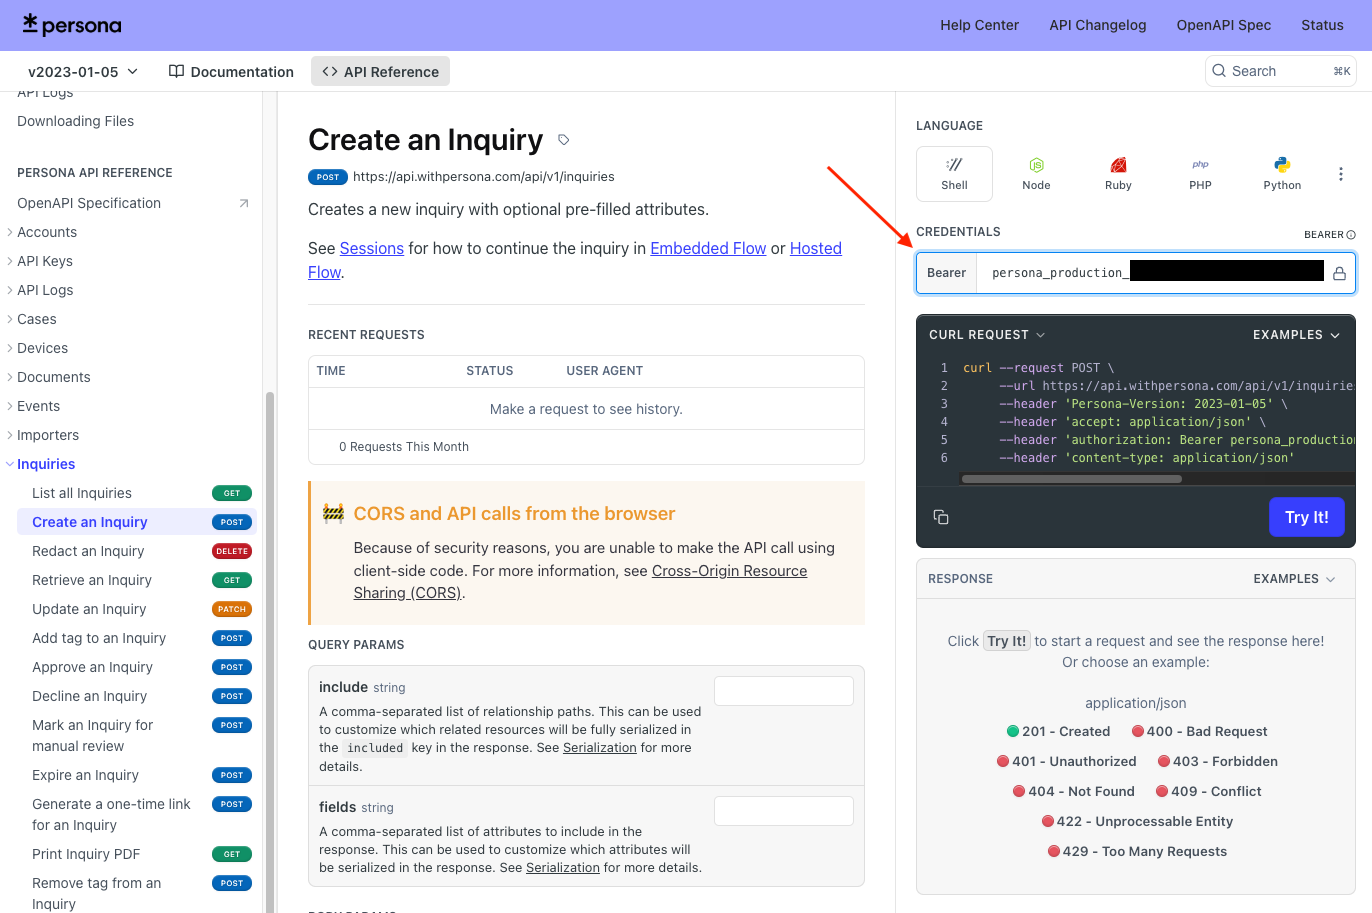
- Go to the Create an Inquiry API page.
- On the right side paste the API key in the text box below “Credentials.” Then click the “Try It!” button.
2. Enter your API Key
-
Locate the "CREDENTIALS" section in the API request panel on the right side of the Create an Inquiry page.
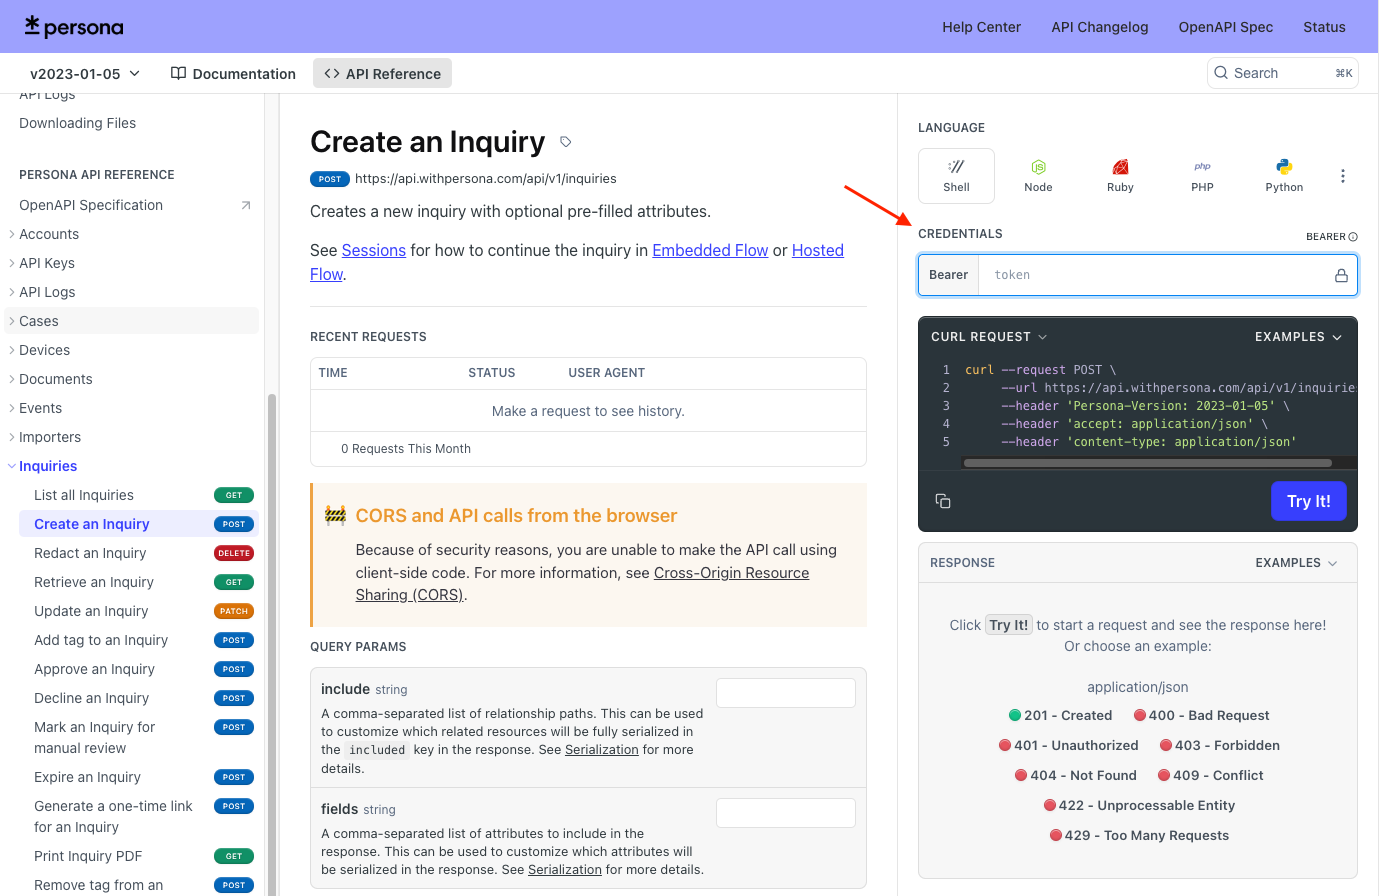
-
Find the "BEARER" token input box (Below “CREDENTIALS”). API keys have distinct prefixes: production keys start with
persona_productionand sandbox keys start withpersona_sandbox. -
Paste your API key (generated in Step 3 of this guide) into this box.
3. Add Inquiry BODY PARAMS
-
On “Create an Inquiry” page, scroll down to the section “BODY PARAMS.”
-
The data object is a required field. First, click "DATA OBJECT" to view the attributes, then click "ATTRIBUTES OBJECT" to access the data fields. These fields compose the JSON request body. You'll find a JSON input box containing default Inquiry details in the request body section
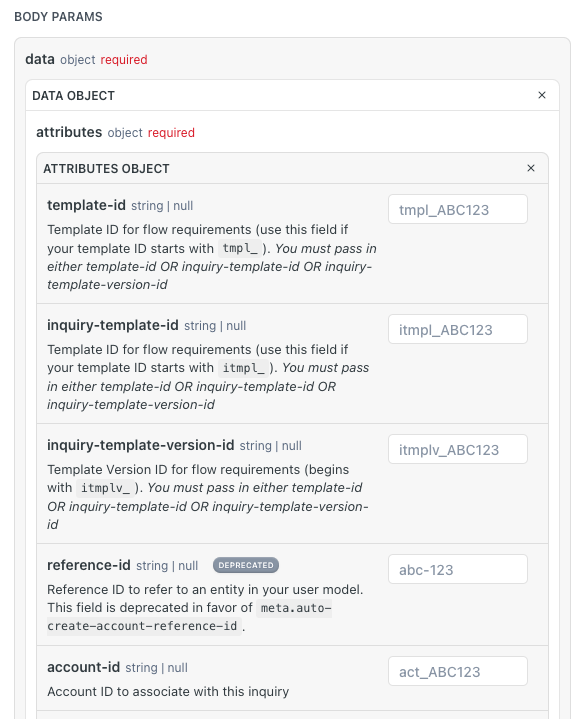
-
Modify the
inquiry-template-idorinquiry-template-version-id- From the Persona Dashboard → Inquiries → Templates and then copy the
IDfor the template you want to create. Template-ids have distinct prefixes: Inquiry template-ids start withitmpl_and a template id starts withtmpl_. You can learn more about template versions here. - You can leave it as is for a basic Inquiry creation.
- From the Persona Dashboard → Inquiries → Templates and then copy the
Example request body:
curl --request POST \
     --url https://api.withpersona.com/api/v1/inquiries \
     --header 'Persona-Version: 2023-01-05' \
     --header 'accept: application/json' \
     --header 'authorization: Bearer persona_sandbox_YOURAPIKEY' \
     --header 'content-type: application/json' \
     --data '
{
  "data": {
    "attributes": {
      "inquiry-template-id": "itmpl_YOURTEMPLATEID",
      "fields": {
        "name-first": "Jane",
        "name-last": "Doe",
        "birthdate": "1994-04-12"
      }
    }
  }
}
'
4. Create the Inquiry
-
Click the “Try It!” button.
-
The request will be sent to
https://api.withpersona.com/api/v1/inquiries. -
When your Inquiry is created successfully, you will see a
200 - OKresponse. For any other response, check the error message or refer to the Error Handling page for more details.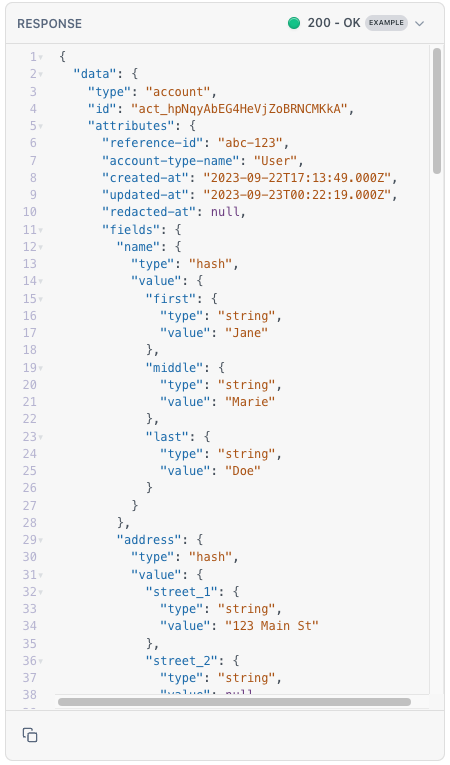
-
To see the inquiry go to the Persona Dashboard → Inquiries → All Inquiries and you will see
Create an Inquiry using the command line (CLI) or with an application
Now that you're familiar with the shape of an API response, you can execute API requests from your terminal (or directly in your application). This allows you to iterate on parsing responses, handling errors, and implementing business-specific actions like pre-filling inquiry fields.
API resource code snippets
The API reference provides code examples in multiple programming languages, including Node.js, Ruby, PHP. You can copy these code snippets directly into your application's codebase.
1. Make the API request
Copy and run the cURL command (or your preferred language) provided by the API Reference into your terminal. At this point, you may consider pre-filling Inquiry fields or setting a Reference ID for the Inquiry as part of how your integrate with Persona. Below is an example of a cURL command:
curl --request POST \
     --url https://api.withpersona.com/api/v1/inquiries \
     --header 'Persona-Version: 2023-01-05' \
     --header 'accept: application/json' \
     --header 'authorization: Bearer persona_sandbox_YOURAPIKEY' \
     --header 'content-type: application/json' \
     --data '
{
  "data": {
    "attributes": {
      "inquiry-template-id": "itmpl_YOURTEMPLATEID",
      "fields": {
        "name-first": "Jane",
        "name-last": "Doe",
        "birthdate": "1994-04-12"
      }
    }
  }
}
'
2. Handle the response
A successful Inquiry creation will return a response similar to the output below. At this point, you may considering programmatically parsing the response based on your integration requirements. For example, when creating an Inquiry via API, a common practice is to store the inquiry ID within your application. This enables you to handle inquiry sessions, resume inquiries, and create valuable user experiences later.
{{
    "data": {
        "type": "inquiry",
        "id": "inq_YOURTEMPLATEID",
        "attributes": {
            "status": "created",
            "reference-id": null,
            "note": null,
            "behaviors": {
                "request-spoof-attempts": null,
                "user-agent-spoof-attempts": null,
                "distraction-events": null,
                "hesitation-baseline": null,
                "hesitation-count": null,
                "hesitation-time": null,
                "shortcut-copies": null,
                "shortcut-pastes": null,
                "autofill-cancels": null,
                "autofill-starts": null,
                "devtools-open": null,
                "completion-time": null,
                "hesitation-percentage": null,
                "behavior-threat-level": null
            },
            "tags": [],
            "creator": "API",
            "reviewer-comment": null,
            "updated-at": "2025-03-10T19:47:47.000Z",
            "created-at": "2025-03-10T19:47:47.000Z",
            "started-at": null,
            "expires-at": "2025-03-11T19:47:47.000Z",
            "completed-at": null,
            "failed-at": null,
            "marked-for-review-at": null,
            "decisioned-at": null,
            "expired-at": null,
            "redacted-at": null,
            "previous-step-name": null,
            "next-step-name": "start_biometric_bf681a_start",
            "name-first": "Jane",
            "name-middle": null,
            "name-last": "Doe",
            "birthdate": "1994-04-12",
            "address-street-1": null,
            "address-street-2": null,
            "address-city": null,
            "address-subdivision": null,
            "address-subdivision-abbr": null,
            "address-postal-code": null,
            "address-postal-code-abbr": null,
            "social-security-number": null,
            "identification-number": null,
            "email-address": null,
            "phone-number": null,
            "fields": {
                "current-government-id": {
                    "type": "government_id",
                    "value": null
                },
                "selected-country-code": { "type": "string", "value": "US" },
                "selected-id-class": { "type": "string", "value": null },
                "address-street-1": { "type": "string", "value": null },
                "address-street-2": { "type": "string", "value": null },
                "address-city": { "type": "string", "value": null },
                "address-subdivision": { "type": "string", "value": null },
                "address-postal-code": { "type": "string", "value": null },
                "address-country-code": { "type": "string", "value": null },
                "birthdate": { "type": "date", "value": "1994-04-12" },
                "email-address": { "type": "string", "value": null },
                "identification-class": { "type": "string", "value": null },
                "identification-number": { "type": "string", "value": null },
                "name-first": { "type": "string", "value": "Jane" },
                "name-middle": { "type": "string", "value": null },
                "name-last": { "type": "string", "value": "Doe" },
                "phone-number": { "type": "string", "value": null },
                "social-security-number": { "type": "string", "value": null },
                "current-selfie": { "type": "selfie", "value": null }
            }
        },
        "relationships": {
            "account": {
                "data": {
                    "type": "account",
                    "id": "act_KNn2MvXmJDJmC4Kzk3ee4HL6FD75"
                }
            },
            "template": { "data": null },
            "inquiry-template": {
                "data": {
                    "type": "inquiry-template",
                    "id": "itmpl_zxDohzpCMnKNnj4no2dDuah8"
                }
            },
            "inquiry-template-version": {
                "data": {
                    "type": "inquiry-template-version",
                    "id": "itmplv_fjBZQqibonc9GdzB6xXR6qymyMph"
                }
            },
            "transaction": { "data": null },
            "reviewer": { "data": null },
            "reports": { "data": [] },
            "verifications": { "data": [] },
            "sessions": { "data": [] },
            "documents": { "data": [] },
            "selfies": { "data": [] }
        }
    }
}
Response error handling
When testing API calls from your terminal or application, pay attention to errors or edge cases. If you receive an error response, review the error message details or consult the Error Handling page for troubleshooting guidance.
You can build error handling into your product or service to handle common issues automatically. For example, you can manage 429 Too Many Requests errors by programmatically monitoring rate limit-related headers in API responses.
{
    "errors": [
        {
            "title": "Bad request",
            "details": "data.attributes.inquiry_template_id must start with itmpl (sent 'itm_zxDohzpCMnKNnj4no2dDuah8')"
        }
    ]
}
Questions?
If you need help, check out our Help Center or contact a support team member.